顯示具有 How? 標籤的文章。 顯示所有文章

2011年8月29日

Create a Contact Form With File Upload Option


Email contact-formThe contact form that I am using on this blog is from emailmeform and it is all free but customized using CSS. I previously published a post on how to customize contact form provided by emailmeform but later due to change in the coding provided by them the styling do not work for new forms so today we will learn to create a simple contact form with no company Ads and along with an upload option that will allow your visitors to send you files straight from your website. The files can be a text file, video, audio, pdf, gif, png, anything. Follow these steps:


Live Demo


Create a Free Web Contact Form

Sign up for a free account at emailmeform
Once you are registered click the "Add a Form" button and choose the form builder option.
add form
Keep your form simple with some important fields only like Name, Website URL, Email, Age, Country, Subject and Message. The form builder looks like this,
form builder
The form builder has blue buttons at left and display at right. When you click a button on left the effect is displayed on right. Now kindly follow as I instruct for keeping things simple and for creating a simple but informative contact form.
Follow this order:
  1. Click the Name button in advance section
  2. Next click Web site
  3. Next Email
  4. Next Hidden Field. Now click the hidden field section on the right and rename it as Age
  5. Next click Hidden Filed again and rename it as Country
  6. Next click File Upload  (Optional you can leave this option if you don't want users to send you files via email)
  7. Now From the Basic section click Paragraph Text & click it to rename it as Message
  8. To make a specific form option a must to fill then simply click that row and select required as shown below
edit form fileds

Your contact form now must look something like this:
contact-form
     9.   Click the Form Title and add some message there for your visitors. For example you can write :
We Love To Hear From You
Feel free to ask for any help. We will catch you back as soon as time allows
If you wish you can remove the form title by unchecking the box and deleting the description text. See below
contact form title
     10.    Now on the form settings choose Redirect URL and insert the page link of your thank you page. A thank you page is something like this
redirect contact form
You may create a separate post for this by giving it an old publishing date. Blogger users can create a Page instead of Post.    
11.  Now replace send Email by submit and align it to right as shown below:
submit button
  12.  Next click the Captcha Code at the bottom and select the none option from the left section as shown below:

remove captcha-code
This security code is often added to prevent spam but I have never used this security code and I honestly have received not even a single spam till today. Just remove it to make the contact form even more neater.
13.   Finally hit the Save Form Button and a window will appear as shown below:
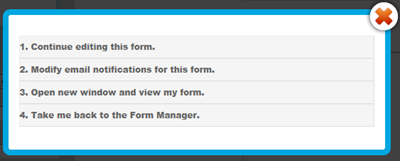
save form
14.   Choose the second option and add a recipient email ID. Choose an ID that you often use so that whenever someone leave a message you may receive it straight in your inbox. You can also add more than one recipients. See below:
add recipient
Leave other options as default. Hit Save! Now choose the third option.
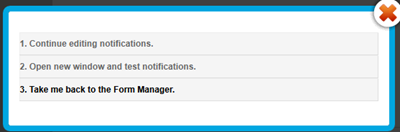
save contact form
15.   In Form manager Click Code
contact-form-code
16.  Choose the HTML Only option and copy the code. Make sure to enter the URL of the page where you want to embed the contact form. See below
copy code
It is therefore better that first you create a Page on Blogger and publish it. Fetch its URL and paste it in the blank "Enter URL where form is embedded"
Now simply copy the code and paste it in your contact page. To delete the emailmeform logo from the contact form find and delete a similar code like the one below from the code you just copied.
  <div><font face="Verdana" size="2" color="#000000">Powered by</font><span style="position: relative; padding-left: 3px; bottom: -5px;"><img src=
  "http://www.emailmeform.com/builder/images/footer-logo.png" /></span><font face="Verdana" size="2" color="#000000">EMF</font> <a style="text-decoration:none;" href="http://www.emailmeform.com/"
  target="_blank"><font face="Verdana" size="2" color="#000000">Forms Online</font></a>
</div><a style="line-height:20px;font-size:70%;text-decoration:none;" href="http://www.emailmeform.com/report-abuse.html?http://www.emailmeform.com/builder/form/r99G329aiV6k6" target=
"_blank"><font face="Verdana" size="2" color="#000000">Report Abuse</font></a>
Publish the page and bingo you are done! I know the steps are lengthy but the result is indeed worth it. In my coming posts you will learn how to completely customize this contact form with your own colors and styles. See our contact form as an example. I just hope you may have found today's tutorial helpful. If you need any help please do not hesitate to post your question. Have fun buddies! :)
Note: Paste the Contact Form code in Edit HTML mode only and hit the publish button on blogger Post Editor. Do not toggle to compose mode because this will collapse the form.

2011年8月22日

How to use google+?

Waiting for a Google Plus invite? Google is rolling out the service in waves and you can expect it to become a ubiquitous social option in the coming months. We have been playing with the service since getting invites yesterday and there are a lot of things to like about Google's new social initiative.

Unlike Google's last big invite-only rollout of a social initiative - Google Wave - users will not be confounded on just what the heck you are supposed to with the service when signing up for the first time. From Friendster, Friendfeed, MySpace and Facebook, users are familiar with how a social platform is theoretically supposed to look. At its core level, Plus is not that much different. Yet, there is so much more. How do you get started with Google Plus? Let's break down the nuts and bolts.

Create Your Circles

Imagine the ability to break down Facebook into its various constituent parts and keep them separate from each other as opposed to one giant feed. That is what Google has done with Plus. There is one main stream where all your friends updates show up then the option to see updates from only certain groups like "Work," "Friends" or "Family." This is the essence of Circles.

From the initial interface, you will see four buttons - Home, Photos, Profile and Circles.

Go_To_Circles.jpg

The first thing you are going to want to do is set up your circles. Click on the tab and it will bring you to a interface where all of your contacts in Gmail (not just Gmail addresses, but all of your contacts) are listed in a panel on top of the screen. Below is a panel that has your various circles. To add a contact to a circle, drag from the top of the list to the appropriate group. Contacts can be added to multiple circles.

Google_Plus_Circle_Drag.jpg

One of the initial problems I had from the circles interface was that I added a couple of "Friends" into my "Work" circle and could not figure out how to get them out. You can do this from the user streams by hovering over the person's name and hovering over "Add to circles" and clicking the appropriate boxes. Yet, from the circles interface, that was not readily apparent. To take people out of a circle, hover above the circle, grab their icon and drag it back into the people plane.

One of the great differentiators between Twitter and Facebook is the "unbalanced" or "balanced" follow. Facebook was initially a two-way follow paradigm - I friend you, you friend me and we see each other's updates. This has been changed with the ability to "like" groups, brands and pages without them following you back. Twitter has always been a one-way follow - I follow you and you do not necessarily have to follow me back.

This line has been blurred in circles. If a person is in your contacts, they can be added to a circle and will get a notification that has happend (but not what circle they have actually been added to). There is also a "follow" circle. Just like Twitter, you can follow people and see their updates without them having to follow you back. As your circles evolve this could allow to track different interests, like Twitter lists.

Google_Plus_Circle_Add.jpg

The Stream and "Bumping"

Once you have set up your circles, go back to the Home screen to see the results. Below the profile picture you will see the choices of stream. You can view your entire stream at once (à la Facebook) or by particular circle.

Google_Plus_Main.jpg

There are two other options below your circles - Incoming and Notifications. Clicking incoming will bring you to messages that have been sent by people outside of your circles. Notifications will show you when people in your circles have commented on something you have posted, or something you have commented on.

Below the circles and notifications there is a tab dubbed "Sparks." More on that below.

One of the killer features of Gmail, or any Google product, is Chat. It has made its way into Plus and sits in the familiar left-hand, bottom-right portion of the screen that it is found in Gmail. Users with a lot of Circle and Chat contacts will like the ability to enable chat for particular groups. Want to surface friends and family but not acquaintances? Plus will let you do that.

If you are using Plus in a Chrome browser, desktop notifications do not pop up when someone sends you a message like it would in Gmail.

Posting a status update in Plus is not like sending a Tweet or updating Facebook. The core functions of an update are present - photos, links, video and location - but when you hit "share" it doesn't automatically post your message to everybody in your circles. You have the option to decide which circles your update is posted to, from individual groups to all circles, to extended circles, or just a single person.

Google_Plus_Chat_Circles.jpg

An interesting feature in the user stream is that conversations will surface back to the top of the feed when subsequent comments are made on a thread. This, according to Google developer Jean-Baptiste Queru, is called "bumping." Google Buzz has this same capability and it was also a feature of FriendFeed.

Photos

Photos in Plus are relatively self-explanatory. Users can update photos from their computers or from their phones, see photos that people in their circles have uploaded. With the Android app, there is a way to upload any photo that you take with your phone straight to Plus, an interesting if slightly disconcerting feature.

When you add a photo, it will prompt you to create an album. Once that album is created it will ask which of your circles you would like to share it with. This is a prime differentiator from Facebook where all of your photos are visible to all of your friends by default (you can change who can view certain photos in Facebook preferences). You can also pick an individual to share photos with instead of an entire circle.

Photo uploading is easy within Plus. Just like adding a picture or an attachment to a Gmail document, you can drag-and-drop from your desktop or click the on the upload button and browse your computer for pictures.

Google_Plus_Photo_Drag.jpg

Users can also add photos by posting them in status updates or by uploading them through the Profile tab.

Profile

If you use any Google products and have a Google account, you have a Google Profile. Profiles are unknown to most of the Internet because, until now, it was relatively useless to anyone but Google.

Your Google Profile is now the hub of you Plus experience, the backbone that everything else is built upon. There are six tabs in your profile page - posts, about, photos, videos, +1s and Buzz.

Google_Profile_Dan_Plus.jpg

A significant change to your profile page is that there is now a location where your +1s live. Until now, when you clicked +1 on content on the Web, nothing happened. The information was sent to Google and integrated into some type of esoteric search algorithm. Users can now see what people have +1ed through their Google Profile. Unlike the Facebook share/like/recommend buttons, it does not go straight into your stream but rather to the profile page.

Sparks and Hangouts

Hangouts is a new feature rolled out with Plus. Essentially it is an area where your circles or a select group of friends can video chat all on one screen. To start a Hangout, go to the "Welcome" button in the home tab. It will prompt you to start a hangout and invite individuals or entire circles. Up to 10 people can be in a hangout at once and it will be seen in that circle or users' stream.

Plus_Hangouts.jpg

Sparks is the part of Plus where you can find content on the Web that you are interested in. In the "Field Trial" version of Plus, it looks like Sparks is a randomized version of content and news generated through Google News. Sparks can be a dashboard for things you are interested in on the Web. When you do a search in Sparks, it will predict what you are searching for with a drop down menu (like old Google search, not quite like Google Instant). You can pin particular topics you search for to the Sparks dashboard for quick access.

You can share articles found in Sparks with a share button on the bottom of every article that surfaces in a search. Like everything else in Plus, it can be shared with a specific person, circle, group of circles or the general public.

For more information, check the videos that Google made explaining Plus and all of its aspects -- Circles, Hangouts and Sparks.


Attack of the Dawn Copyright © 2011 -- Template created by Hanley Siu -- Powered by Blogger